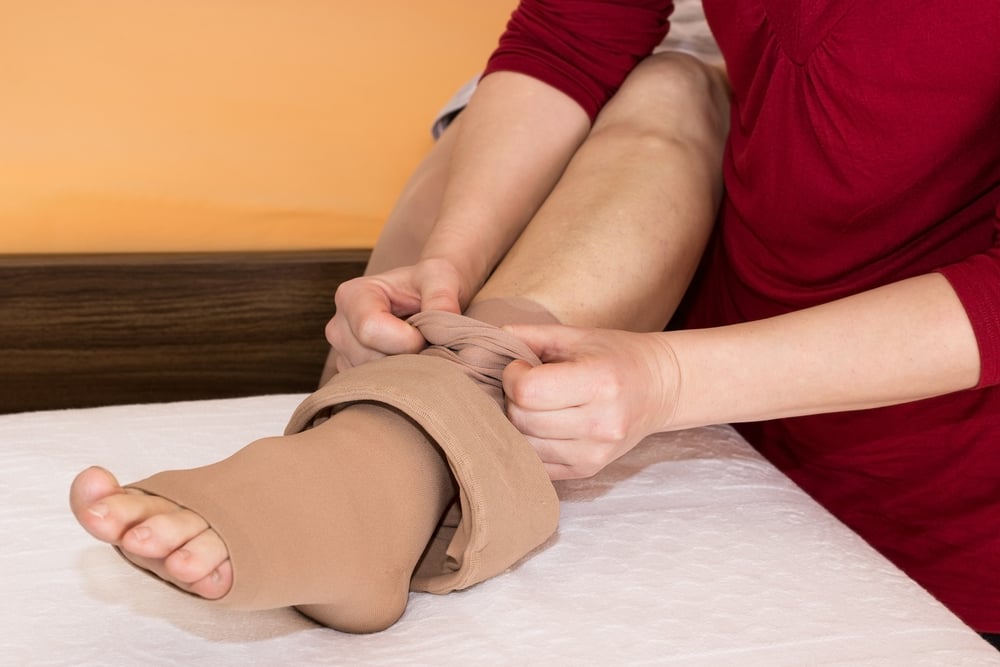

Step-by-Step Guide to Putting on Compression Stockings
Compression stockings are a true medical marvel. They improve blood flow, reduce swelling, and help manage various vein and circulatory conditions. However, if you've tried putting them on before, you know it’s rarely an easy task. Whether you're a patient, caregiver, or health care professional assisting others, mastering the art of donning these garments can save time, energy, and frustration.
This guide will introduce you to simple, effective techniques for wearing compression stockings comfortably and correctly, ensuring you get maximum benefits from this essential medical device.
Understanding Compression Stockings
Compression stockings are designed to provide therapeutic pressure to your legs. This consistent pressure improves blood circulation, reduces swelling, and can prevent complications such as deep vein thrombosis (DVT) or varicose veins. The snug fit and tight compression are vital for their effectiveness but can make them particularly challenging to wear.
To properly wear compression stockings, finding the right technique and ensuring the perfect fit is essential.
Five Proven Methods for Putting on Compression Stockings
1. The Rubber Gloves Technique
Sometimes, a better grip is all you need. Using rubber gloves offers a practical solution for handling slippery compression stockings without damaging the fabric.
Here’s how it works:
- Wear a pair of rubber gloves (any durable household gloves will do).
- Use the gloves’ grippy texture to get a firm hold on the stocking.
- Gently pull the stocking over your foot and up your leg.
2. The Inverted Stocking Method
This method is a go-to for beginners because it allows you to work the tightest part of the stocking efficiently.
Step-by-step process:
- Turn the stocking inside out by grabbing the heel from the inside.
- Slide your foot into the stocking’s toe area while holding the heel.
- Gradually roll the fabric over your foot, heel, and up your leg.
- Smooth out any wrinkles for even pressure distribution.
3. The Plastic Bag Method
This method is particularly helpful for open-toe stockings and simplifies getting the stocking over the most challenging part—your heel.
Here’s how to do it:
- Place a small plastic bag (like a grocery or sandwich bag) over your foot.
- Slide the stocking over the bag-covered foot and heel.
- Pull the bag through the stocking’s open-toe area.
- Remove the bag and adjust the stocking as needed.
4. The Sock-Over Method
Adding a pair of socks can make slipping compression stockings on much simpler.
Follow these steps:
- Put on a thin polyester sock over your foot.
- Pull the compression stocking over the sock until it’s positioned correctly.
- Remove the polyester sock while keeping the compression stocking intact.
5. The Stocking Butler Approach
For those with limited mobility or anyone who finds traditional methods difficult, a stocking butler can make life easier.
To use a stocking butler:
- Place the stocking over the frame of the device.
- Stand or sit as you slide your foot into the device.
- Use the butler’s handles to pull the stocking up your leg.
Stocking butler devices are widely available and a great investment for making compression stocking use stress-free.
Essential Tips for Daily Wear
Once you’ve mastered the art of putting on compression stockings, these tips will help you gain the most from your daily wear:
- Timing Matters: Put your stockings on first thing in the morning when your legs are least swollen.
- Stay Consistent: Wear them throughout the day and remove them before bedtime unless instructed otherwise.
- Check for Fit: The stockings should be snug, but not so tight that they cause pain or discomfort.
- Smooth Wrinkles: Ensure an even fit to prevent any pinching or uneven compression.
- Replace Regularly: Compression stockings lose elasticity over time—replace them every 3 to 6 months.
Keeping these tips in mind ensures you’re wearing your stockings correctly and enjoying their full therapeutic benefits.
Care and Maintenance
To extend the life of your compression stockings and keep them effective, follow these care tips:
- Wash Daily: Handwash with mild soap and lukewarm water after each use.
- Skip the Heat: Avoid using dryers or exposing stockings to direct sunlight.
- Rotate Pairs: Have at least two pairs so you can alternate between them while one dries.
- Inspect for Wear: Replace stockings as soon as they lose elasticity or start to fray.
Proper care will keep them hygienic, comfortable, and functional for much longer.

When to Seek Help
Compression stockings are often prescribed as part of a medical plan, so correct use is crucial. Seek assistance from a health care provider if:
- You experience discomfort or pain while wearing your stockings.
- The stockings do not fit properly despite using the correct size.
- You find putting them on too challenging, even after trying the techniques described here.
Your provider can help evaluate whether you’re using the proper stockings, demonstrate how to wear them in person, or recommend custom-sized options.
Don’t hesitate to reach out—getting this right can significantly improve your quality of life.
For more information, check out our Comprehensive Guide to Compression Stockings. If you have any questions, don't hesitate to contact us for assistance.